Access the INFN Cloud Object Storage from a scientific environment
Introduction
INFN Cloud Object Storage data can be accessed and managed via command line or mounted directly as a folder or synchronised on your computer or on a cloud environment. This can be achieved by using rclone, oidc-agent software and a custom python script that generetas the necessary S3 credentials from the OIDC token.
Installing Rclone
Rclone can be installed on Linux, macOS, and Windows using the following methods.
Linux
Download and install the latest version:
sudo -v ; curl -L https://rclone.org/install.sh | sudo bash
Or manually install the precompiled binary:
Fetch and unpack
curl -LO https://downloads.rclone.org/rclone-current-linux-amd64.zip
unzip rclone-current-linux-amd64.zip
cd rclone-*-linux-amd64
Copy binary file
sudo cp rclone /usr/bin/
sudo chown root:root /usr/bin/rclone
sudo chmod 755 /usr/bin/rclone
Install manpage
sudo mkdir -p /usr/local/share/man/man1
sudo cp rclone.1 /usr/local/share/man/man1/
sudo mandb
Alternatively, install via your distribution's package manager:
# Debian/Ubuntu
sudo apt install rclone

# Fedora/RHEL
sudo dnf install rclone
macOS
For macOS we strongly advise to install the precompiled binaries as the versions available on package managers may have issues with FUSE and mount.
Download the latest version of rclone.
cd && curl -LO https://downloads.rclone.org/rclone-current-osx-amd64.zip
Unzip the download and cd to the extracted folder.
unzip -a rclone-current-osx-amd64.zip && cd rclone-*-osx-amd64
Move rclone to your $PATH. You will be prompted for your password.
sudo mkdir -p /usr/local/bin
sudo mv rclone /usr/local/bin/
Finally remove the leftover files.
cd .. && rm -rf rclone-*-osx-amd64 rclone-current-osx-amd64.zip
Windows
Latest version of Windows 11 have winget package manager pre-installed. If not, update the App Installer package from the Microsoft store.
To install rclone using winget, run the following command in a PowerShell terminal:
winget install Rclone.Rclone
Alternatively, you can use other package managers like Chocolatey or Scoop.
# Using Chocolatey
choco install rclone

# Using Scoop
scoop install rclone
You can also manually install rclone on Windows by downloading the latest Windows binary from the official website and extracting it to a directory in your PATH.
Installing and configuring oidc-agent
Follow the instructions listed in the official installation guide.
Please note that with oidc-agent >= 5 aud mode must be specified in
the configuration. It can be configured with with by creating the file
$HOME/.config/oidc-agent/issuer.config.d/infn-cloud with the following
content:
{
    "issuer": "https://iam.cloud.infn.it/",
    "register": "https://iam.cloud.infn.it/manage/dev/dynreg",
    "legacy_aud_mode": true
}
Then, make sure to restart the oidc-agent:
oidc-agent-service kill
eval $(oidc-agent-service use)
Create a new oidc client
First of all, it is necessary to configure an OpenID Connect (oidc) client on each machine you want to access the object storage from using Rclone.
You can follow the steps below to register a client named
infn-cloud-s3:
# the following command has to be executed once in every shell, can be put
# in the ~/.bashrc file
eval `oidc-agent-service use`

# the following command allows to register a new client named "infn-cloud-s3";
# the client name can be freely changed, just make sure to change its name
# accordingly in next steps; you need to run this command only once
oidc-gen -w device --iss=https://iam.cloud.infn.it/ \
--scope="openid profile offline_access" --aud=object infn-cloud-s3
The oidc-gen command will ask you to log into the INFN-Cloud IAM
(https://iam.cloud.infn.it/) and authorise the client creation and the
use of scopes.
Please note that the client will expire after 30 days, but you can easily refresh it by running the following command:
oidc-gen --reauthenticate infn-cloud-s3
and following the instructions to authenticate again using INFN-Cloud IAM.
Configure rclone to access INFN Cloud Object Storage via oidc-agent
Rclone can be configured creating the file
$HOME/.config/rclone/rclone.conf with the following content:
[infncloud]
type = s3
provider = Ceph
env_auth = true
endpoint = https://rgw.cloud.infn.it/
Selecting the env_auth option instructs rclone to use the environment
variables for authentication. The set those variables you can use any
of the methods supported by AWS clients. In this guide we will use a
helper script that retrieves temporary S3 credentials using the OIDC
token managed by oidc-agent.
Download the helper scripts
Make sure you have jq and xq tools installed, as they are required
by the script for parsing JSON and XML responses. Download the script
from the following link and save it as
$HOME/.local/bin/s3-cred-oidc.sh:
curl -Lo $HOME/.local/bin/s3-cred-oidc.sh https://baltig.infn.it/infn-cloud/user-support-scripts/-/raw/main/obj-storage/s3-cred-oidc.sh?ref_type=heads
Finally make the script executable:
chmod +x $HOME/.local/bin/s3-cred-oidc.sh
The wrapper script will then be invoked by rclone to retrieve temporary S3 credentials.
Configure rclone to use the helper script
To configure rclone to use the helper script, you need create or modify
the $HOME/.aws/config file with the following content:
[default]
credential_process = $HOME/.local/bin/s3-cred-oidc.sh
; On some systems you may need to also specify the following:
; request_checksum_calculation = when_required
; response_checksum_validation = when_required
Please remember that if you have set up a password when creating the oidc-agent profile, you have to manually load the oidc-agent profile after each reboot
oidc-add infn-cloud-s3
Alternatively, you can write the password in a file with the proper secure permissions (chmod 600) and specify it as a script argument:
[default]
; or passing a password file
credential_process = $HOME/.local/bin/s3-cred-oidc.sh --oidc-profile OIDC_PROFILE_NAME --oidc-pw-file OIDC_CLIENT_PASSWORD_FILE
Please note that this method is less secure than manually loading the profile, as it involves storing the password in a file, even if with restricted permissions. We suggest to use this method only if you have a secure environment and you are sure that the password file will not be accessed by unauthorized users.
You can read more about the script usage and parameters running the
script with the --help flag:
$HOME/.local/bin/s3-cred-oidc.sh --help
Use rclone
Interact with the buckets
Rclone supports a number of storage management operations. Refer to the
output of the rclone --help command for a detailed list of commands.
A non-comprehensive list of examples is reported below:
rclone ls infncloud:/<object>     # list the specified object, bucket
                                  # file, or folder
rclone cat infncloud:/<object>    # dump the content of the specified
                                  # object to stdout
rclone copy <source> <dest>       # copy the "source" into destination
                                  # "dest". One of the two can be a
                                  # "infncloud:/<object>"
rclone delete infncloud:/<object> # delete the specified object
Mount as a filesystem
Rclone allows to mount remote object storage as filesystems on
your local machine, using the mount rclone command.
To use this feature, you may need additional libraries
installed and configured on your system.
Linux
Usually on Linux systems you need to have installed fuse or fuse3
packages. Those may be already installed on your system, if you
installed rclone via your distribution package manager.
Once you have the necessary libraries installed, you can mount the INFN Cloud Object Storage bucket as a filesystem using the following commands:
mkdir -p ~/infncloud
rclone mount infncloud:/<your_username> ~/infncloud/ --daemon
To un-mount the filesystem use the fusermount command:
fusermount -u ~/infncloud
macOS
On macOS you can mount an rclone remote as a local drive by either using macFUSE or by the experimental built-in NFS server.
Using macFUSE
If you prefer to use FUSE mounts, you can install macFUSE, a traditional FUSE driver utilizing a macOS kernel extension (kext). However, if you are using recent versions of macOS on a Apple Silicon based Mac additional steps are required to allow the kernel extensions to run:
-
Shut down your Mac completely and wait a few seconds.
-
Boot into Recovery Mode by holding the power button after the chime and Apple logo, until a boot selection screen appears.
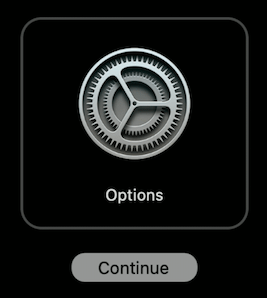
-
Select on 'Options' by clicking on it, then click 'Continue' or by selecting it using the arrows on your keyboard pressing return on your keyboard.
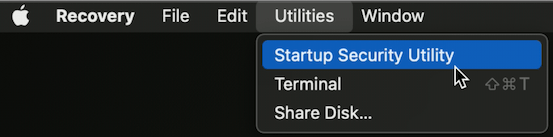
-
From the menu bar at the top of the screen, click Utilities and then select Startup Security Utility.
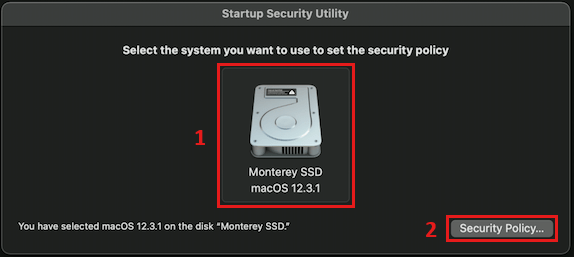
-
Select your boot disk and click on the 'Security Policy' button.
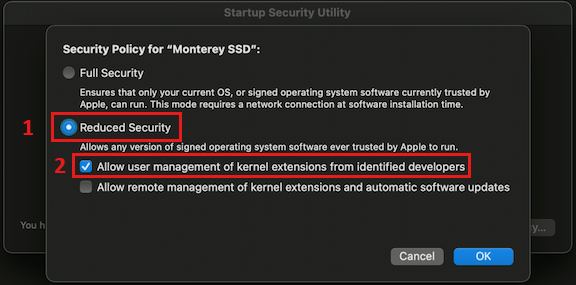
-
On the pop-up windows select the 'Reduced Security' mode and check the first option with the label 'Allow user management of kernel extensions from identified developers', then confirm by click 'OK'.
- Restart your Mac from the Apple menu.
After installing macFUSE, you can mount the INFN Cloud Object Storage bucket as a filesystem using the same Linux commands:
mkdir -p ~/infncloud
rclone mount infncloud:/<your_username> ~/infncloud/ --daemon
Using the built-in NFS server
The built in NFS server does not require any additional software to be installed and it was introduced to enable the mount command on recent macOS versions where installing FUSE may be difficult.
However, please note that the NFS server is still experimental and
may have limitations and/or require additional configuration for
specific use cases. As an example, it does not have any authentication
method so anyone will be able to access the data it exposes. You
can use workarounds such as using the serve nfs command on the
loopback address, rely on secure tunnels or use firewalling.
To read in detail about the NFS server usage please refer to the dedicated page of the rclone documentation.
Windows
To mount a bucket in a Windows machine you need to download and install WinFsp, an open-source Windows File System Proxy, that provides FUSE-like capabilities on Windows. You can download WinFsp from its official website: WinFsp.
Windows operates with distinct filesystem types for network and fixed drives, assuming that fixed drives are fast and reliable, while network drives may exhibit higher latency and reduced reliability. Typically, rclone mounts the remote as a standard fixed disk drive by default.
Alternatively, you have the option to mount it as a remote network drive, commonly referred to as a network share. If you encounter unexpected errors or issues using the default mode, it is advisable to consider mounting the bucket as a network drive instead.
When mounting as a fixed disk drive you can either mount to an unused drive letter, or to a path:
# Mount to an unused drive letter
rclone mount infncloud:/<your_username> *

# Mount to a path
mkdir C:\infncloud
rclone mount infncloud:/<your_username> C:\infncloud
When mounting as a network drive you can only do it to an unused drive
letter, specifyinbg the --network-mode flag at the end of the command:
rclone mount infncloud:/<your_username> X: --network-mode
We strongly suggest you to read more about the Windows mount options in the rclone documentation page.