Deploy a dedicated INDIGO IAM (sys-admin nomination required)
Prerequisites
The user has to be registered in the IAM system for INFN-Cloud https://iam.cloud.infn.it/. Only registered users can login into the INFN-Cloud dashboard https://my.cloud.infn.it.
- For more details regarding registration please see Getting Started
User responsibilities
Important
The solution described in this guide hides the automatic deployment of Virtual Machines (VM) on the INFN-Cloud infrastructure. The instantiation of a VM comes with the responsibility of maintaining it and all the services it hosts.
Please read the INFN Cloud AUP in order to understand the responsibilities you have in managing this service.
Important
If IAM as a Service is deployed as a production service for a VO, allowing user registration, the administrator shall be designated as a Person authorized for personal data processing in the context of the INFN DataCloud infrastructure in accordance with Article 29 GDPR. The nomination has to be required via ticket to the user-support team, including details about the VO and about the project.
Selection of the Deployment type
Important
By default, a local "admin" IAM user is created. The password associated to this account is "password". You must change immediately this password after the deployment is completed by connecting to the IAM instance via browser. Alternatively, you can register a personal account, give it admin privileges and remove the "admin" user.
Note
If you belong to multiple projects, i.e. multiple IAM-groups, after login into the INFN-Cloud dashboard, select the one to be used for the deployment you intend to perform from the lower left corner. Not all solutions are available for all projects. The resources used for the deployment will be accounted to the respective project, and impact on their available quota. See figure below.

Once the project is selected, choose the "INDIGO IAM as a Service" button from the list of solutions available for your group:

Select either Automatic or Manual scheduling as shown below:


In the first case, the Orchestrator will take care of choosing the best available provider, in the other case it will be performed a direct submission towards one of the providers available, to be selected from the drop-down menu. In the case of manual scheduling, the flavors displayed on the next page will be those offered by the chosen provider.
A menu is made available, as in the figure below:

"Description" is a mandatory field.
Deployment parameters are split in several pages and their effect is well described by both the corresponding dashboard captions and the official IAM documentation:
-
Basic:
CONTACT EMAIL: reference person's address for certificate renewalACTIVE PROFILES: Spring profiles for IAM allowing user registration and password reset.datacloudprofile is the default one;prod(i.e. production) andregistrationprofiles are highly recommended. The profiles usually set (prod,registrationanddatacloud) starts an IAM environment where only the Admin user is registered in the application with username/password. Addoidc(i.e. Google) orsaml(for INFN AAI) profiles for authentication with external providersIAM VERSION: the supported version is currently the v.1.13.1, and this is the default. It can overwritten (also with the taglatest), even if we don't guarantee the correct behaviorJWT DEFAULT PROFILE: it is used to configure the claims contained in the token, default toiam; can also bewlcgoraarcENVIRONMENT VIARIABLES: docker environment variables (key-value pairs)SERVICE PORTS: ports to be opened on the VM for external access to its services. By default only the SSH port (22) is opened. Please consult INFN Cloud Rules of participation the "Networking" section in order to see what are the ports that you can specify in this field. If the port you intend to use is in the list of closed-ports, you have to formally request its opening and motivate the request by following the How To: Request to open ports on deployed VMs guideFLAVOR: select the flavor for the VM
-
Organisation:
ORGANIZATION NAME: the name of the organizationLOGO URL: the URL for the logo image
-
Notification
MAIL HOST: for IAM notification delivery. By default is set to the INFN email server, which requires having an enabled account; otherwise you can use another suitably configured email serverMAIL PORT: the email server portMAIL USERNAME: the email account usernameMAIL PASSWORD: the email account passwordMAIL SMTP AUTH: false by default. If true it enables specific authentication method with SMTP serverMAIL SMTP STARTTLS: false by default. If true it enables STARTTLS protocol for connectionsNOTIFICATION FROM: the email address used as the sender in IAM email notificationNOTIFICATION ADMIN ADDRESS: the email address used as the recipient in IAM email notification
-
Privacy Policy
privacy_policy_url: parameter for policy acceptance by the user; the policy document must be provided via a URL
-
Advanced (optional functionalities)
- set the deployment creation timeout
- do not delete the deployment in case of failure
- send confirmation email when the deployment is completed (default behavior)
After submitting the deployment, the user is redirected to the deployment list:

Note
If the creation of a deployment fails, an additional option (retry) is introduced in the drop-down menu, allowing the user to resubmit the deployment with the same parameters.

If the deletion of a deployment fails, resulting in the status being set
to DELETE_FAILED, the "delete (force)" button is displayed in the
list of available actions, allowing the user to force the deletion of
the deployment:

When the deployment is completed, the IAM endpoint url and the IP of
the VM are returned in the output values page.

Below there is an example of the IAM login page after a successful deployment:

Note
The IAM service starts using certificates signed by a test certification authority (CA). Therefore, when you access the IAM web page, a "Security Warning" message may be displayed. You can safely accept the warning and proceed to log in to the IAM service.
How to manage the service
The dashboard form provides the basic parameters for the IAM service. If administrators need to fine-tune the service or to enable the VOMS-AA plugin to obtain proxy certificates for the VO (organization name), they have to log into the VM and modify the docker compose parameters.
The docker compose file
It includes the following services:
-
certbot: container for requesting a Let's Encrypt certificate to be saved in the/opt/iam_voms-aa/certbot/letsencryptlocal folder mounted in the NGINX services -
setup: INDIGO IAM setup container, which is mainly used to generate the JWKS keystore containing the signing keys for JWT tokens, and the JKS keystore for connecting to SAML providers (INFN AAI) -
trust: container used to create volumes containing test, IGTF, and Let's Encrypt CA certificates -
db: INDIGO IAM database, also read-accessible by VOMS-AA -
iam-be: INDIGO IAM container, also called iam-login-service -
nginx-iam: NGINX container acting as TLS termination and proxy toiam-be. Accessible at https://${DNS_NAME} -
client: a client application for IAM that redirects toiam-befor authentication. It responds at https://${DNS_NAME}/iam-test-client -
vomsaa: VOMS-AA container, service that issues VOMS proxies -
nginx-voms: patched NGINX container to support TLS communication via VOMS proxy. Forwards requests tovoms-aaand responds athttps://${DNS_NAME}:8445.
At the beginning, the running services are the following
root@vnode-0:~# docker ps
CONTAINER ID   IMAGE                                       COMMAND               CREATED       STATUS                 PORTS                                                                          NAME
0c3831ba2a9b   nginx:stable-alpine                   /docker-entrypoint.…     3 weeks ago   Up 3 weeks (healthy)   0.0.0.0:80->80/tcp, [::]:80->80/tcp, 0.0.0.0:443->443/tcp, [::]:443->443/tcp   nginx-iam
aabf5a111e3b   indigoiam/iam-test-client:v1.13.1     /__cacert_entrypoin…     3 weeks ago   Up 3 weeks (healthy)                                                                                  client
cf1c90f5eb69   indigoiam/iam-login-service:v1.13.1   /__cacert_entrypoin…     3 weeks ago   Up 3 weeks (healthy)                                                                                  iam-be
71d1ec586511   mysql:8                               docker-entrypoint.s…   3 weeks ago     Up 3 weeks (healthy)   3306/tcp, 33060/tcp                                                            db
By default, VOMS-AA and nginx-voms are not enabled. The Admin can decide
to start the VOMS-AA service, if needed. Moreover,the IAM is configured
to automatically add new users to the group labeled as the organization
(VO name). Inside the VM, the docker compose file and all the other
necessary files are located in the /opt/iam_voms-aa/ directory.

Let's Encrypt certificate
The IAM service is deployed with a test certificate, to allow the
communication between the certbot and nginx-iam services needed to
obtain a Let's Encrypt certificate. The latest is stored in the
/letsencrypt/live/${DNS_NAME} directory of the nginx-iam service.
sudo docker exec -it nginx-iam /bin/sh
inside the container:
# cd /letsencrypt/live/192.135.24.218.myip.cloud.infn.it/
/letsencrypt/live/192.135.24.218.myip.cloud.infn.it # ls -l
total 12
-rw-r--r--    1 root     root           692 Mar 27 14:16 README
lrwxrwxrwx    1 root     root            57 Mar 27 14:16 cert.pem -> ../../archive/192.135.24.218.myip.cloud.infn.it/cert1.pem
lrwxrwxrwx    1 root     root            58 Mar 27 14:16 chain.pem -> ../../archive/192.135.24.218.myip.cloud.infn.it/chain1.pem
lrwxrwxrwx    1 root     root            62 Mar 27 14:16 fullchain.pem -> ../../archive/192.135.24.218.myip.cloud.infn.it/fullchain1.pem
lrwxrwxrwx    1 root     root            60 Mar 27 14:16 privkey.pem -> ../../archive/192.135.24.218.myip.cloud.infn.it/privkey1.pem
In the compose file uncomment the production certificate:
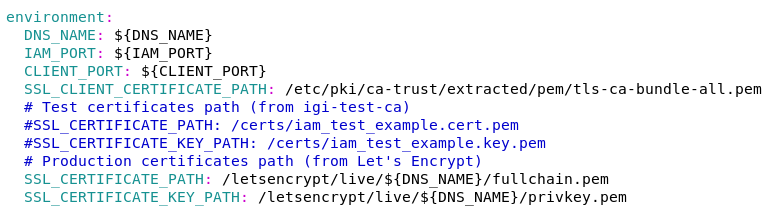
When expired, the renewal of the certificate has to be done restarting the certbot container:
sudo docker compose up certbot
Login with INFN AAI
In order to login through INFN-AAI you have to instantiate the service
enabling the saml profile.
To register the IAM service into the INFN IdP you have to get the
content of the self-signed certificate from the iam-be container.
sudo docker exec iam-be awk '!/-----/ {printf "%s", $0}' /indigo-iam/WEB-INF/classes/config/self-signed.cert.pem > for_saml
Use the content of the for_saml file (the self.signed IAM certificate)
to fill the required XML form reported below, and then to submit it,
with the other required information, to the AAI team through the "Send
SAML SP Metadata" page.
<md:EntityDescriptor
    entityID="https://(( your FQDN(:PORT) ))"
    xmlns:md="urn:oasis:names:tc:SAML:2.0:metadata">
    <md:SPSSODescriptor
        AuthnRequestsSigned="true"
        WantAssertionsSigned="true"
        protocolSupportEnumeration="urn:oasis:names:tc:SAML:2.0:protocol">
        <md:KeyDescriptor use="signing">
            <ds:KeyInfo xmlns:ds="http://www.w3.org/2000/09/xmldsig#">
                <ds:X509Data>
                    <ds:X509Certificate>((for_saml content))</ds:X509Certificate>
                </ds:X509Data>
            </ds:KeyInfo>
        </md:KeyDescriptor>
        <md:KeyDescriptor use="encryption">
            <ds:KeyInfo xmlns:ds="http://www.w3.org/2000/09/xmldsig#">
                <ds:X509Data>
                    <ds:X509Certificate>((for_saml content))</ds:X509Certificate>
                </ds:X509Data>
            </ds:KeyInfo>
        </md:KeyDescriptor>
        <md:SingleLogoutService
            Binding="urn:oasis:names:tc:SAML:2.0:bindings:HTTP-POST" Location="https://(( your FQDN(:PORT) ))/saml/SingleLogout"/>
        <md:SingleLogoutService
            Binding="urn:oasis:names:tc:SAML:2.0:bindings:HTTP-Redirect" Location="https://(( your FQDN(:PORT) ))/saml/SingleLogout"/>
        <md:NameIDFormat>urn:oasis:names:tc:SAML:1.1:nameid-format:emailAddress</md:NameIDFormat>
        <md:NameIDFormat>urn:oasis:names:tc:SAML:2.0:nameid-format:transient</md:NameIDFormat>
        <md:NameIDFormat>urn:oasis:names:tc:SAML:2.0:nameid-format:persistent</md:NameIDFormat>
        <md:NameIDFormat>urn:oasis:names:tc:SAML:1.1:nameid-format:unspecified</md:NameIDFormat>
        <md:NameIDFormat>urn:oasis:names:tc:SAML:1.1:nameid-format:X509SubjectName</md:NameIDFormat>
        <md:AssertionConsumerService
            Binding="urn:oasis:names:tc:SAML:2.0:bindings:HTTP-POST" Location="https://(( your FQDN(:PORT) ))/saml/SSO" index="0" isDefault="true"/>
        <md:AssertionConsumerService
            Binding="urn:oasis:names:tc:SAML:2.0:bindings:HTTP-Artifact" Location="https://(( your FQDN(:PORT) ))/saml/SSO" index="1"/>
    </md:SPSSODescriptor>
</md:EntityDescriptor>
To start the VOMS-AA service
Log into the VM
sudo docker compose -f /opt/iam_voms-aa/compose.yaml up -d nginx-voms
The running services are the following:
root@vnode-0:~# docker ps
CONTAINER ID   IMAGE                                       COMMAND             CREATED       STATUS                 PORTS                                                                          NAME
791fba2bf968   iam-nginx-voms                        /docker-entrypoint.…    3 weeks ago   Up 3 weeks             0.0.0.0:8445->8445/tcp, [::]:8445->8445/tcp                                    nginx-voms
33820b0ee4c2   indigoiam/voms-aa-bp:v1.13.1          /cnb/process/web        3 weeks ago   Up 3 weeks (healthy)                                                                                  vomsaa
0c3831ba2a9b   nginx:stable-alpine                   /docker-entrypoint.…    3 weeks ago   Up 3 weeks (healthy)   0.0.0.0:80->80/tcp, [::]:80->80/tcp, 0.0.0.0:443->443/tcp, [::]:443->443/tcp   nginx-iam
aabf5a111e3b   indigoiam/iam-test-client:v1.13.1     /__cacert_entrypoin…    3 weeks ago   Up 3 weeks (healthy)                                                                                  client
cf1c90f5eb69   indigoiam/iam-login-service:v1.13.1   /__cacert_entrypoin…    3 weeks ago   Up 3 weeks (healthy)                                                                                  iam-be
71d1ec586511   mysql:8                               docker-entrypoint.s…    3 weeks ago   Up 3 weeks (healthy)   3306/tcp, 33060/tcp                                                            db
By default VOMS uses test certificates.
The LSC file (to be stored in your User Interface in the path
/etc/grid-security/vomsdir/vo-name/voms.test.example.lsc) is
/C=IT/O=IGI/CN=voms.test.example
/C=IT/O=IGI/CN=TEST CA
The vomses file (to be stored in your User Interface in the path
/etc/vomses/<vo-name>) is:
"<vo-name>" "${DNS_NAME}$" "8445" "/C=IT/O=IGI/CN=voms.test.example" "<vo-name>"
To validate VOMS attributes it is necessary to get the test CA (to be
stored in your user interface in the path
/etc/grid-security/certificates):
sudo docker compose cp vomsaa:/etc/grid-security/certificated/igi_test_ca.pem > igi_test_ca.pem
Users have to link their certificate in the IAM account to require and obtain a voms proxy.
Note
To run a production VOMS service, it has to be executed using an
IGTF certificate that has to be added to the nginx-voms container.
You can modify the value of SSL_CERTIFICATE_PATH and
SSL_CERTIFICATE_KEY_PATH, overwrite or mount a new /vomsdir and
then restart the nginx-voms container. The IGTF certificate must be
requested from HARICA, and it is strongly recommended that the FQDN
be an ad hoc name registered in the INFN-Cloud DNS (without including
the IP address in the hostname, to avoid the need for a new
certificate if the VM hosting the IAM is destroyed). The IAM manager
should therefore open a ticket to the user-support team, providing
details on both the certificate request (to be approved by a HARICA
approver) and the DNS entry.

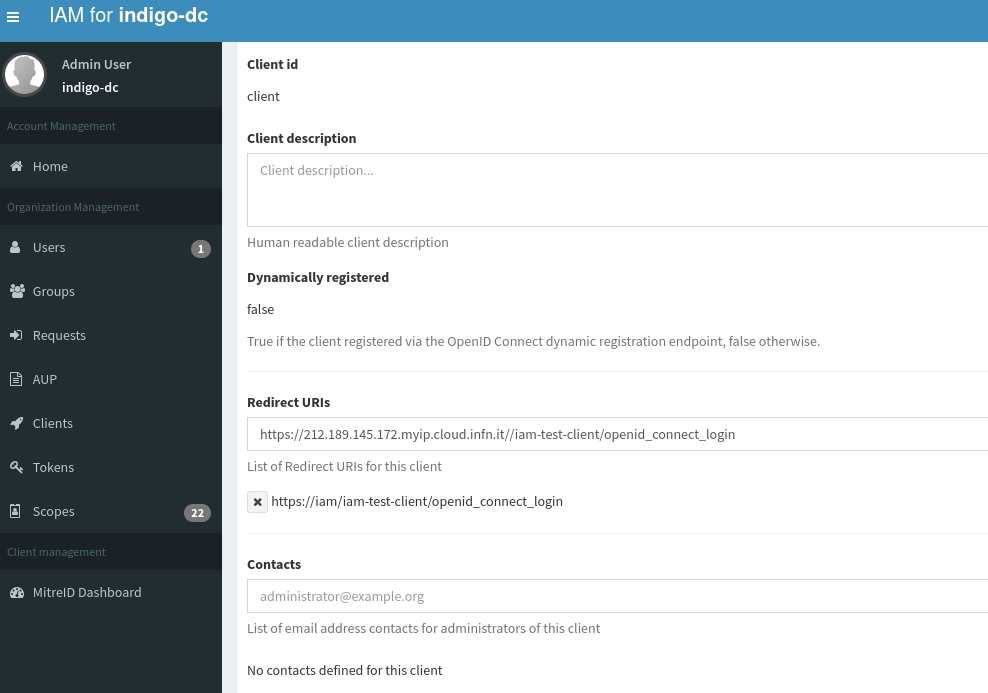
nginx-voms certificate to modifyTo use IAM Client application
After the login as Admin in the IAM service page (IAM endpoint), the
Admin has to click on "Clients", select the "TEST client" and add the
correct client redirect uri:
https://${DNS_NAME}/iam-test-client/openid_connect_login